Light Fest- The Light Fest

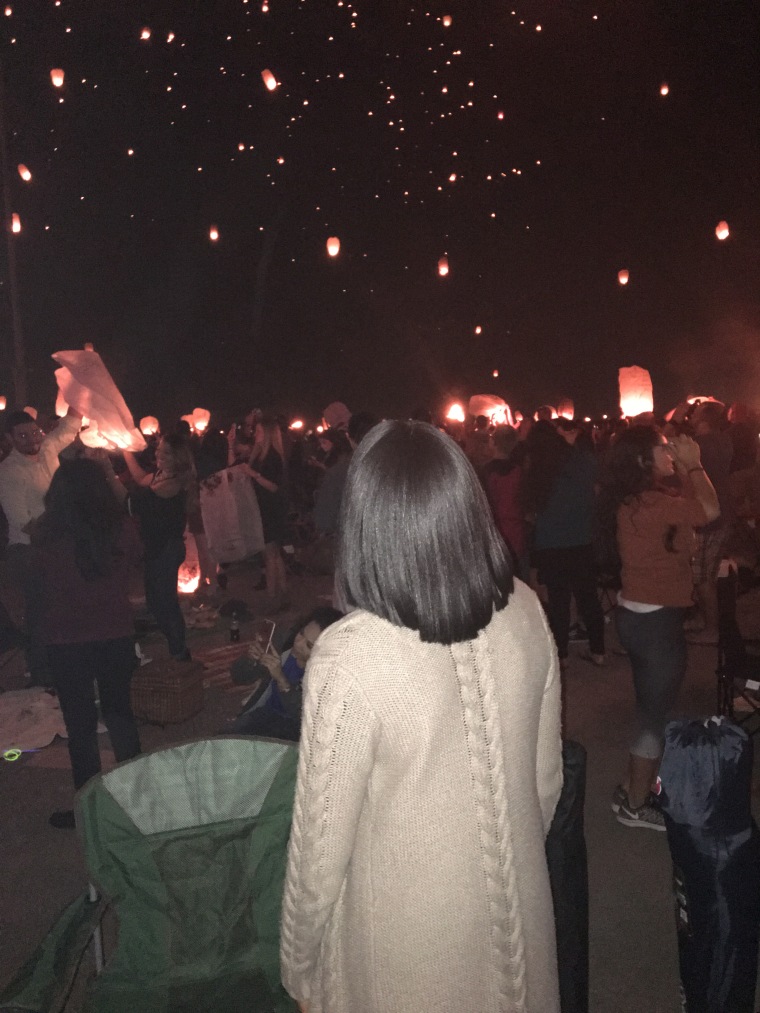
With the Christmas period coming up there has been a new company called the the Light Fest. The Light Festival is an amazing, magical evening allowing adults, couples and families to make a lifetime memory by making wishes and dreams to the sky by letting go of fears, and embracing your true self to light fire to lanterns. The light Festival is a family friendly event which takes place rain or sun with environmental friendly lanterns made of sustainable materials and will be picked up once the lanterns fall to the ground.

IMG_2567.JPG

img_1752

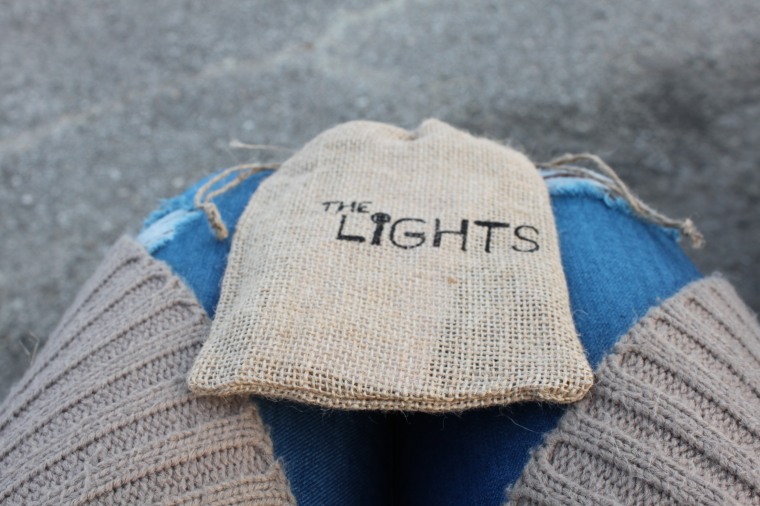
The Light fest does not allow any pet animals at this event. The light Fest is priced depending on available tickets and approximate to event dates. Prices range from $25-$55 and include a lantern, a marker and key chain flashlight inside a swag bag.

I have always wanted to attend a light festival event especially after watching a number of Korean dramas on DramaFever and Viki. So when I saw this event on Facebook, I knew this was a must see and even cancelled an extra credit event for class to attend this event.

The light festival started at 1:30pm with check-in to receive your swag bags and get seats. I wouldn’t really call this a festival because there wasn’t really much to do. They had a couple of stalls providing food from hot dogs, burgers, fries, turkey legs and nachos. Plus a small stage  where they performed some live music by a singer called Mitchell Ferguson. Mitchell Ferguson is a singer born and raised in Dallas Texas for more information on him check him out on YouTube.

We arrived late around 3:00pm which made it a long wait time, so it is important to bring plenty of things to do to entertain yourself. Even better bring food and snacks and make this into a feasting slumber party and even bring a movie or a board game or two. The event truly starts around dark which can vary depending on sunset of the day. We started around 6:30pm and the event was truly beautiful and magical, and one of the best events I’ve ever been to. Throughout all of my adrenaline events just seeing the beauty in the world is by far the best.

img_1790

img_1801

If you plan on going to the event check out some of the tips below and make sure you are prepared.

Tips: 

  1. Bring your own food, drinks and snacks(A Indian family brought more dishes than I could count and everything smelled and looked amazing.)
  2. Bring Blankets and chairs to sit on the floor (make this into a slumber party, relax and keep warm)
  3. Bring Books and games for the wait time (there was no internet).
  4. Arrive closer to lantern lighting if you don’t want to wait around.
  5. Bring cash for parking and food.
  6. Bring a large group- the more people the more fun.
  7. Buy your tickets early to get the cheapest price.
  8. Leave late (parking was extremely bad – couldn’t get out of the parking lot straight away).

Below are some more pictures including a video. Thanks for reading Guys and let me know what you think. Comment, Like and Subscribe.

Enchanted Rock- Central Texas

Hey Guys! I am back with yet another adventure blog post. There is nothing I love more than getting out and having an eventful weekend. This week I went to a state park in Texas called the “Enchanted Rock” for a geology university trip.

Background

Enchanted Rock State Natural Area is located in  the hill country of Llano Uplift approximately 17 miles north of Fredricksburg Texas. Enchanted Rock is a massive pink granite dome spanning 640 acres and rises 425 feet above the surrounding area to an elevation exceeding 1825 feet above sea level. Enchanted Rock is the largest pink granite mountain in the United States.

There are a number of amenities available including a Park store, Hot Showers, Stargazing, Technical climbing and of course Hiking Trails. There are also campsites available upon request and reservation located near the shower building, where you can use the grills, lantern holders, tent pads and picnic tables. However there are no areas available for RV or vehicle camping. Reservation are required for overnight stays specially for Fridays-Sunday.

Enchanted Rock is open from 8am-10pm, (10pm for day time visitors) and costs $7 per person per day and is free for children 12 years and below. Peak visitors time are September-May and Holiday weekends. When the parking lot is full the park will limit the number of visitors allowed in the park and may even turn you away, so make sure to call ahead and arrive early.

img_1589

Personal Experience 

I have never really hiked before so this was a new experience for me. Once I got started I didn’t want to stop. I guess the will power to reach the top is a powerful motivation. Thankfully the weather was perfect with clear skies without a single cloud to be seen. It was sunny but breezy which was a blessing with Houston weather. The hike to the top was difficult with no clear hiking trail and a deep incline it was without a doubt a struggle but once you get the hang of it, it becomes almost second nature.

Once you reach the top you are met with 360 breathtaking scenery on top of a pink granite dome, I describe it as “baron but beautiful”.

img_1585

I don’t know where you could find better views.

img_1575


img_1582

The return trip is no joke. I am not sure which is harder the way up or the return trip back down. Due to the extreme decline, going down can  be a tricky but the trick is to go slowly and watch every single step you taking.

Tips:

  • Make sure to call ahead or leave early during peak season (September-May and Holiday weekends)
  • Make sure to bring cash but they also accept cards
  • Make sure to bring plenty of water.

If you are ever in Texas try to check out the Enchanted Rock, you won’t regret it. That’s it for this weeks blog. Hope you enjoyed it and let me know what you think. Know anymore amazing places in Texas? let me know in the comments below! Thanks for taking the time to read my blog.

Lone Star Trapeze Academy 

After taking a couple of art classes I thought it was about time to try an outdoor activitie. I love nothing more than ticking off items on a list and to take “Fly Trapeze” off my bucket list was no exception.
Now I was supposed to be going with a group of people but they backed out last minute and I was not going to waste a perfect Saturday sitting at home so I set my GPS to Lone Star Trapeze Academy and began my 2 hour journey.

Lone Star Trapeze Academy is located in Bryan College Station Texas by a little league baseball stadium their are three instructors, Chad Davis, Rhys Challicombe and Stacy Majors totaling 25 years of experience between them. Bryan College Station is two hours away but it was worth the drive. Although I trapezed alone, my sister came for moral support.

Luckily in Houston this year the September heat wasn’t so bad, also it was extremely windy, which is a blessing for those who knows how cruel the Texas heat can be.

Before hitting the flying Trapeze set, you are given a quick safety course and then some practice then quickly pushed on to flying trapeze (not literally). After previously doing some high altitude activities I am slightly scared of heights but that was not going to stop me.

Now when you start they give you a routine to attempt and once you have mastered it, they add a new skill. Here are the steps:

  1. You first start off with holding onto bar and swinging off a platform
  2. hooking your legs onto the bar and releasing your hands from the bar
  3. Swinging stretch
  4. Holding on to the bar with your hands and unhooking your legs
  5. Swinging your legs back and fourth in quick motion to do a back-flip
  6. Dropped down onto a net

If you are able to master everything, you are able to perform a catch by performing the swinging stretch to be grabbed by an instructor. (I wasn’t able to do this one)

Now before you get worried, everything is done with a safety line which was the first question I was asked before starting.

The first attempt is able about overcoming your fears which i know did by screaming ( which I was the only one to do so) after that its all about remembering to listen to instructor and positioning your body correctly throughout each attempt.

Well that is the end of my Trapeze experience but it was not the end of the day.I went to Cafe Eccell. If you want to hear about it …. you are going to have to wait until next week. 🙂

Zip-Lining at Lake Travis, Thai Plus Wood Class Austin!

Zip-Lining at Lake Travis, Thai Plus Wood Class Austin!

Hey Guys! Next on my bucket list was to go zip-lining. Me and my sister went essentially as a joint late/early birthday sisterly bonding bash. Me turning 21 and my sister turning 26. I came absolutely prepared for hiking in the heat, unlike my sister who looked like she had arrived for a catwalk show in heavy cotton thick clothing and make-up all in the Texas 100+ degree heat.

The Zip-Line company was called Lake Travis Zip-line. There are a total of five zip-lines ranging from 250 feet to over 2800 feet, with hiking in between. The Tour is lead by an experienced tour guide educating you throughout the tour and also providing a boost of moral support for the nervous people such as myself. The overall tour is around 3 hours with a minimum weight limit of 70 pounds and maximum of 250 pounds. The lighter you are the slower you will go (which is completely unfortunate for my sister).

The experience started with a boat ride over to the island where we took pictures, grabbed water for the trip and got our helmets and equipment.

Bunny Slopes (300 ft and 400 ft)
The first two zip-lines are the beginner slopes called the Bunny Slopes (300 ft and 400 ft) used to get you comfortable with the experience (which was still scary at the beginning) especially when you have to remember to lift your legs at the end of each zip-line to ensure you don’t slap your legs against the platform (creating a huge bruise) or to grab the magically small orange handle at the end of each zip-line to ensure you don’t start slip backwards into the middle of the zip-line, at the end. (God help you if that happens).

When you are going down the zip-line for the first time you will probably have a huge brain fart like me and forget every single instruction they tell you at the beginning, thankfully they shout to remind you when you approach the end of the zip-line.
When you are not zip-lining down the mountain, you have plenty of opportunities to take pictures and take in the beautiful scenery and landscape. Plus the guide will take pictures and videos with your phone if you ask before each zip-line. They even have photo opportunities including being able to high five a tour guide while they hang on the top of the zip-line.

Leap of Faith (1800ft)/Line of Majesty (1600ft)
The third and fourth zip-lines are the peak before the fall and are completely breathtaking. I managing to make it down the zip-line alive along with all my belonging plus without a single scar.

Double Barrel Shotgun (2800ft)
The fifth and final zip-line is really a monster and is a dual zip-line which allows you to race down to the bottom in high speeds over the lake. They encourage you to jump off the platform like you are “Jumping into a pool” as the zip-line is so long that the cable will be saggy at the start.

Zipline offers and deals

The zip-line, offers night and day zip-lining tours, however the night tours are certain dates, which I am tempted attend. Prices are $117 and a couple of cents with tax (not including tip) throughout the week and weekend. However they do have many coupons such as kids (Ages 16 and below) are free with a paying adult during the summer and a groupon for tours Sunday-Friday for $86 dollars (not valid on night tours)

Tips for Zip-lining

  1. Make sure to bring snacks
  2. Pack light and bring a fanny pack (You will have to carry your own equipment for the zip-line which is pretty heavy already)
  3. Make sure you have a wrist strap attached to all gadgets and phones
  4. Bring an action camera and an extra battery to capture all the action
  5. Don’t bring water (water is provided through the tour at each zip-line, you will be informed each time)
  6. If you go with a friend make sure to get two actions camera for the dual zip-line.
  7. Sun Screen, the sun’s rays are constantly beaming down on you
  8. Mosquito repellent in case mosquitoes are out and hungry

Lunch at Thai Passion

After our zip-lining adventure the hunger was killing us so it was time for Thai at Thai Passion. The food was amazing and we both orders appetizers which were Passions rolls and Tod Mun. Passion rolls are vegetarian deep-fried spring rolls with crystal bean thread, Chinese mushroom, carrot, cabbage and served with Thai sweet & sour sauce.

While Tod Mun are deep fried fish cakes with green beans and red curry, served with cucumbers sweet & sour sauce, topped with grounded peanuts.
Me and my sister both ordered a Thai Curry. I got the Thai Passion Curry (Garee), a Thai yellow curry with potatoes, carrots, onions, and bell peppers, served with cucumber salad. Then my sister got the MUS-MUN, a Thai curry with potatoes, peanuts, carrots, and onions in coconut milk.

I don’t normally like anything coconut but this one was amazing.

Hardwood and Lace Class
I planned a Hardwood and Lace class using a groupon for $25. Now I know what you are thinking, what is a Hardwood and Lace wood class? (My sister couldn’t help but complain before the class). Hardwood and Lace is a sign painting workshop they specialize in painting wood pallet signs. There are several phrase options including your name, “be brave little one”, “& they lived happily ever after” and much more.
I think it was a day well spent and hopefully there will be many more to come.

Websites for each of the companies are below as well as pictures + Videos. Thanks for reading, please like, comment and subscribe.

Want to check of the company for zip-lining Look no further https://www.ziplaketravis.com/

Thai Passion: http://www.thaipassion.com/

Wood Class: https://www.hardwoodandlace.com/

Pinky’s Kayak Tour

Pinky’s Kayak Tour

Kayaking has been on my bucket list for a while and although it isn’t very adventurous it is still my first experience.  I am not a outdoors or heat person so I made sure to bring insect repellent, sun screen and a hat (plus i am a super sweaty person). If you live in Houston you know how hot it can get but lucky for me it was every breezy (Thank the lord).

Going Kayaking was a workout in itself, my muscles were screaming the next day but I loved the experience plus I have no swimming skills so the possibility of drowning any minute kept me on my toes to ensure I didn’t accidentally  tip over my kayak. I went kayaking with a member of my meetup group which allowed us to share a tandem kayak.

I went for a 3 hour kayak tour in El Lago Texas about 40 minutes from Downtown Houston. The tour was ran by Pinky’s Kayak Tour, with a group size of around 10-15 people. The tour began at Bay Area Park where we were given a safety course and a quick introduction on how to paddle with two people. I have to say it took a good 20 minutes to be able to even paddle properly and we were the last people struggling in the back of the group.

Once we got the hang of it, it became a mini one sided competition with the unexpected group members who probably just saw some fool trying to overtake them (I can’t stop myself from being super competitive).

During the tour I found it difficult to hear the tour guide as they were faster. (I have to say, I wish they did separate groups for those with kayaking experience and those with none, I would have preferred a slower pace).

The wildlife really depends on the season but luckily  we were able to see a couple of American Alligators (I wasn’t even scared of them, even though I should have been), turtles and even a cow or two! I don’t really know the type or name of the turtle (I have a short attention span) but the area and wildlife was beautiful.

The beginning of the tour was the easiest but on the way back I couldn’t get enough breaks. When I first wanted to do a kayaking tour I thought why not do a 5 hour tour, I mean get the best value for my money. OMG if I got the 5 hour tour I would have climbed on the bank and walked back to the park.

Here’s my advice for any of the beginner kayakers:

  1. Choose a Guided Kayak (I was planning on doing a self-guided tour, so happy I didn’t. Having someone there for the first time was worth it).
  2. Make sure to put phone and gadgets into a zip lock bag.
  3. Bring snacks.
  4. Bring some kind of cushion or support for your lower back and butt (seriously I don’t know how many times I wanted to get up and stretch my back, those seats are so hard).
  5. Make sure to do a tandem kayak which is a kayak for two people. (although it is harder to navigate and paddle with two people, it absolutely helps to allow one person to rest while the other paddles, taking it in turns helps to make a more enjoyable ride).

Why don’t you try it next! Check out there website: https://pinkyskayakrental.com/

Hey want to checkout my pics! Scroll down